
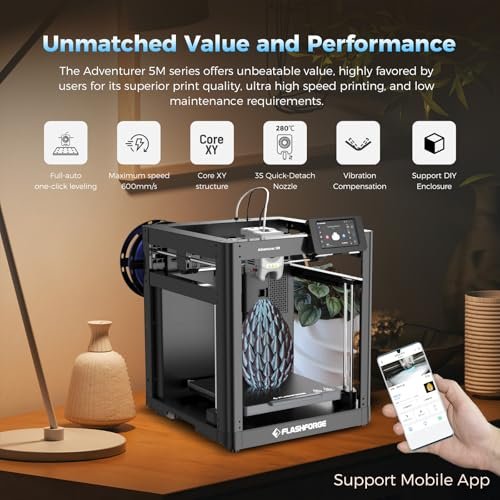
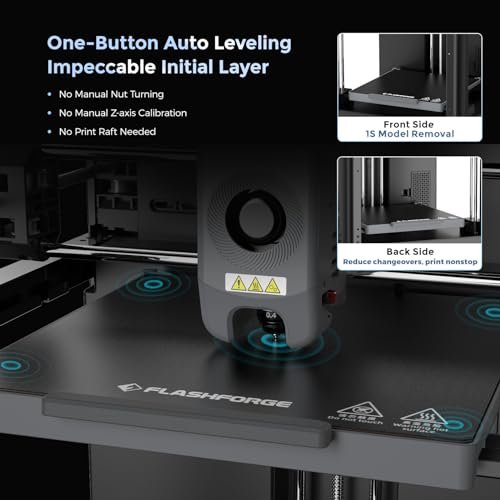
- One-Click Automatic Printing: Experience hassle-free 3D printing with the Adventurer 5M Series. Enjoy automatic bed leveling for flawless first layers, ensuring consistent adhesion and saving time with no manual adjustments required.
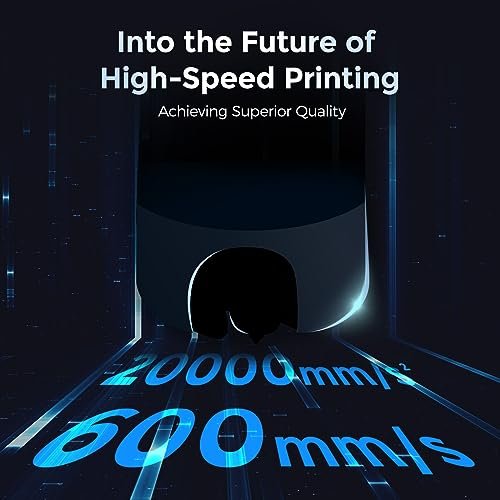
- 12X Ultra Fast Printing: Featuring a Core XY structure with 600mm/s travel speed and 20000mm/s² acceleration, the AD5M maximizes efficiency, reduces production cycles, and ensures high precision, making it ideal for rapid prototyping and mass production.
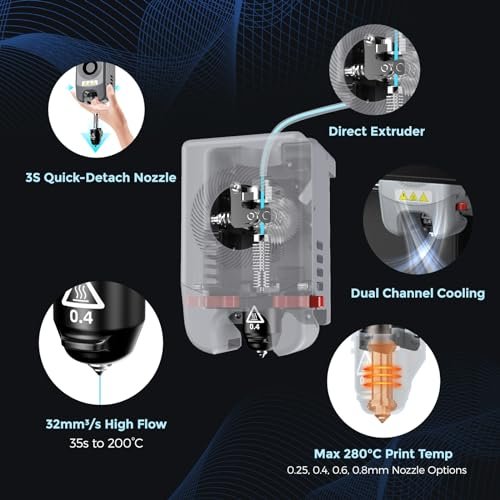
- Smart and Efficient Design: Quick 3-second nozzle changes, a high-flow 32mm³/s nozzle, and fast 35-second warm-up to 200°C deliver stable high-speed printing. Its dual-sided PEI platform and versatile options provide easy removal and adaptability for various creative projects.
- Superior Print Quality and Remote Monitoring: With dual-fan nozzles, vibration compensation, multiple nozzle sizes (0.25-0.8mm), and a 280°C direct extruder, the AD5M ensures top-tier print quality. Use the Flash Maker mobile app for real-time monitoring and intelligent operation, making your printing experience seamless.
- Maintenance and Troubleshooting: For optimal performance, regularly maintain your printer by cleaning the nozzle and platform. If you encounter any issues, please refer to the A+ FAQ section for troubleshooting tips and solutions.
-7%
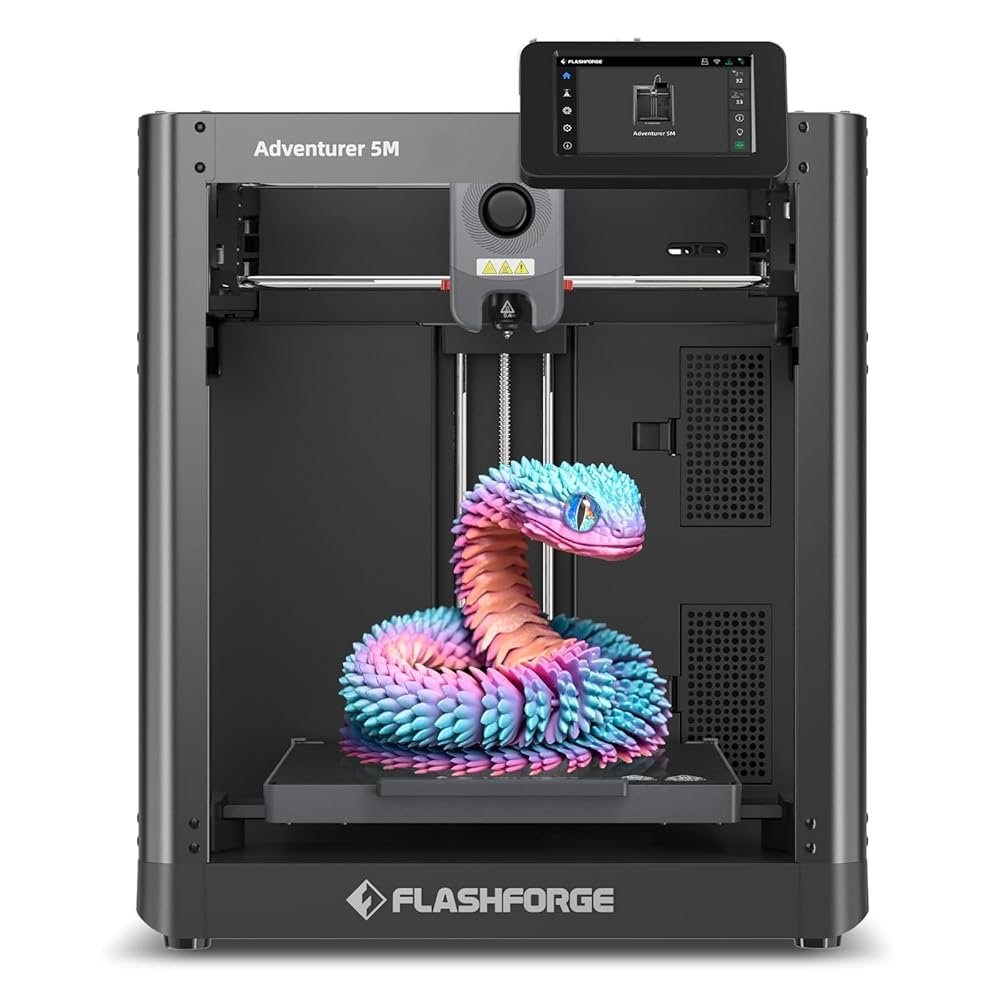
FLASHFORGE Adventurer 5M 3D Printer with Fully Auto Leveling, Max 600mm/s High Speed Printing, 280°C Direct Extruder with 3S Detachable Nozzle, Core XY All Metal Structure,…
$207.20 Save:$16.00(7%)
Available in stock
Description
Additional information
| Product Dimensions | 15.83 x 14.29 x 17.64 inches |
|---|---|
| Item Weight | 23.8 pounds |
| Item model number | Adventurer 5M |
| Date First Available | September 1, 2023 |
| Manufacturer | Zhejiang Flashforge 3D Technology Co., Ltd. |
| Country of Origin | China |
Reviews (2577)

BC –
The media could not be loaded.
J’ai littéralement aucune compétences en machine 3d d’où l’achat de cette machine clef en main et je regrette rien ♡.
Et j’adore instalation en 5 minutes, parametrage 2 et impression du petit cub rouge de test 10 min après le déballage.
Elle est silencieuse pour une machine 3d (comparaison au grosse ouverte) on entend seulement les ventilateur pour le refroidissement = bruit d’un pc poussiéreux ^^.
Elle a une jolie qualité de finition de pièces
et un bon rendu qui peut être amélioré en diminuant la vite est autre technique (voir bateau).
Les pièces qui sont changeable sont pas chères et au nombre de deux seulement ^^.
Le plateau est en vente sur Amazon pour 15-20€ . Pour pouvoir enchaîner les impressions rapidement et la tête d’imprimante est aussi sur Amazon à 30€ . Donc rien avoir avec les DIY ou il faut des tonnes de pièces pour maintenir ça machine et excessivement chère .
Attention la zone d’impression est de 15cm x15cm donc reste petit mais on peut couper les impressions :).
En résumé, elle est pas chère et sans réglage donc parfait pour les foyers voulant une machine et bloquant sur le prix ou sur l’installation/maintenance. Et protège avec ca boite pour éviter au enfant de ce faire mal.
Je vous la recommande donc à 300%.
Erfel Earl Yumul –
Choisi pour son caractère “plug & play”, je n’ai pas été déçu de ce côté là. Simplement branchée puis étalonnée facilement (l’imprimante prend 9 points sur la plateforme que l’utilisateur doit ajuster via l’écran tactile. Personnellement j’ai étalonné à l’aide d’une feuille de papier : elle doit toucher la tête d’impression mais quand même pouvoir glisser sur la plateforme). J’ai de suite fait imprimer le modèle de cube déjà présent dans la mémoire. J’ai été agréablement surpris du résultat, aussi bien que l’on est en droit de l’attendre d’une imprimante 3D filaire bien réglée.
Après quelques essais, l’impression a l’air fiable, sur les petites pièces que j’ai imprimé jusqu’à présent. Ce qui nous amène à la petite contrainte de ce modèle : elle ne peut imprimer que des pièces de 150x150x150 mm. Ce n’est pas forcément gênant (en tout cas ça ne l’est pas pour moi – je l’ai achetée en connaissance de cause) mais à prendre en compte.
En revanche, la chauffe est très rapide, l’imprimante est assez silencieuse (pour une imprimante 3D), si ce n’est ces horribles bips au démarrage de l’imprimante et à la fin d’une impression, qui heureusement sont désactivables via le menu.
Autre petit défaut, l’imprimante n’a jamais réussi à se connecter à mon réseau wifi (mais mon code wifi compliqué en est peut être la cause), donc je l’ai branchée en filaire.
Enfin, le logiciel d’impression 3D dédié FlashPrint est tout à fait suffisant, il est assez intuitif. Il permet peut être un peu moins de finesse de réglage que d’autres logiciels, mais ceux-ci sont alors plus complexes. A choisir en fonction des besoins. Je veux quelque chose de “plug & play” donc FlashPrint me convient. Et avec FlashPrint, l’envoi d’impression 3D via le réseau est a priori fiable et rapide.
Cette imprimante répond globalement à mes attentes, je la recommande donc à ceux qui comme moi sont novices dans le milieu de l’impression 3D. Au final, la seule condition pour l’acquérir est de savoir dessiner en 3D… élémentaire, mais il convient de le rappeler tout de même.
Mack Roark –
Lengthy… I apologize.
I purchased this after spending several weeks researching 3D printers. Their price points are all over the place and, as to be expected, the more features they have the more expensive they run. The initial reason for wanting a 3D printer is to make custom cutters for polymer clay. After reading dozens of reviews for different printers, I decided that this model from Flashforge would meet our needs and allow for more complicated projects in the future.
It arrived the day after I ordered it (yay, Prime). Nice heavy duty box and excellent packing so it arrived in pristine condition. It is an impressive looking piece of equipment and seems to be well built. Unboxing and setup took about 30 minutes and was relatively painless. The relative part came with things that even the FlashForge website doesn’t make clear. So, I’ll have a go at it.
There is a fair amount of software you need. The Flashforge website has flashy descriptions of what these do but does not really say what you need to get started.
To begin with, you need FlashMaker. This is an app for iPhone, iPad, or an Android device. It is available from the app stores for the related devices. You will not be able to set up the printer without it as you have to make an account to register it and finish the setup. Once you have it, the setup is fairly straightforward and the display/touch screen on the printer guides you through the process easily. It did take a few tries to get it attached to the WiFi network but patience paid off.
In the full disclosure department, we am newbies. So there was the need for a 3D application that we could use to create the projects to send to the printer. We didn’t want to spend a fortune on this and after looking at all the options, I found TinkerCAD for the iPad. It is an Autodesk product (think AutoCAD), is web based (though the is an app in the Apple App Store for the iPad that connects you to where you need to be), and it is free. Granted, I am sure if you are going for heavy engineering type 3D, you probably want a higher end application and most likely a higher end printer. I watched 3 YouTube videos on TinkerCAD and I was creating 3D objects in less than an hour. You can design directly in the app though I’ve taken another route for the time being. You’ll still need this in the process though to create the .STL files you will need later.
I also learned how to create designs in Procreate on my iPad that could be exported out as PNG files. These need to be converted to .SVG files to be able to use them in TinkerCAD. There are a number of free web based conversion sites available.
Then there is printing. Oh boy! Flashforge talks about a number of software applications on their website but it is very unclear what you need them for. Short answer: the .STL files from TinkerCAD need to be converted to .GX files for the printer to use. The printer comes with a thumb drive (USB A) that contains a Software folder with two applications: FlashPrint 5 and Orca-Flashforge. FlashPrint 5 is, as far as I can tell, a more consumer friendly version with fewer bells and whistles than Orca. Herein is the rub. I do almost all my graphics on my iPad and these applications require a desktop/laptop computer running either Windows, MacOS, or Linux. In my case, I have a MacBook Pro running the latest version of MacOS (Sequoia 15.0.1). Much to my surprise, the applications on the thumb drive, would not install as they were considered legacy version and not compatible with my OS. The versions on the drive were updated as of 04/28/24, which was before the latest version of the MacOS was released. I tried Flashforge’s website and had the same issue. The haven’t updated the installers for the newest version. That’s when the panic set in as I was now looking at an expensive device that I could not use.
Fortunately we had an older MacBook Air that we had not updated. It is running MacOS Monterey 12.6.1. Crisis averted and I got the applications installed. I was able to import the .STL file and run the slicer to produce the .GX file for printing. If I had installed Orca, I could apparently send the file to the printer via WiFi (my next project). Using FlashPrint 5, I went old school and downloaded the .GX file to the thumb drive. The printer has a USB A port. Popped in the drive, let the printer warm up, and voila! A 3D object. By the way, the HEPA filtration system on the Pro does a great job of keeping the fumes down.
Other than the software installer mess, the process was relatively painless and I must say that is it a deeply satisfying experience to handle your first 3D object.
In closing, this is a very cool printer and I’d recommend it to anyone who wants a reasonably priced entry level device. Save yourself a world of frustration and make sure you have:
1. Your phone or tablet with Flashmaker installed so you can setup your printer.
2. A computer with the capability of installing FlashPrint 5 and/or Orca-FlashForge*
3. And, of course, a 3D application capable of producing .STL files, which seem to be one of the most common types.
Hope this overly long dissertation was helpful.
*My guess is the MacOS version prior to Sequoia (MacOS 15) will work based on the dates on the installer files, but that is exactly what it is: a guess). I will be initiating a conversation with Flashforge about getting the installers updated.
BC –
I had never been super interested in 3D Printing as I had no real use for it, and so never looked in to how any of it worked or how things were supposed to be set up. As I started getting more and more in to DIY tech stuff where the standard is 3D printed parts for assembly, as well as wanting to do more Wargaming stuff than I could reasonably afford, I decided to finally jump at getting a 3D Printer that was geared towards new users that have all the basic bells and whistles to minimize potential set up issues and any health hazards from having the thing set up in my bedroom, and the Flashforge 5M Pro was what I settled on. Worst case scenario, I could get the few things I needed then sell it to a friend who could use it more than i can so I’m not completely out $450.
All that said to stress that I am a complete beginner and learned from knowing literally nothing as I set this thing up.
Set-up was easy. Unbox it, follow the instructions to remove all packing and accessories then un-screw the bed. Turn it on and connect it to your WiFi network. Get the mobile app (which sucks) for your phone and Flashforge Orca for your desktop (which sucks less). Send the printer through its self calibration once it’s set where you want to keep it. Put the filament spool on the holder, feed it through the tube following the on-screen instructions and let the system prime the filament load (mine spat out a bunch of red filament from the factory QA testing before priming the included sample). Then, update the Printer’s firmware (this is important as the app and Orca will not be able to connect and control the printer without this step). Then, print the calibration cube. Then, print the Benchy. For me, there were absolutely no issues. Set up went without a hitch, calibration and benchmark prints went great, and the printer was ready for use after that.
I grabbed some Official Battleshovel 39,999 stls to test how well things printed minis and figure out setting up support structures and managing print settings and then I went on to Cults3D and grabbed some cheap models of stuff I really liked from some creators and spent a couple days printing some cool stuff at higher resolution and refining my settings.
Bed leveling before each print took a couple extra minutes but I’ve yet to have a failed print, the tip and bed both heat up to go mode really quickly, the size of the bed is great for pretty much anything I can think of short of full-sized multi-day prints of cosplay gear, print durability is as good as your settings are, this printer will do what you tell it to do without fuss, and the design of the printer is great. Sleek, enclosed, the internal ventilation is really nice to have, and the top and front clear doors are great for keeping an eye on things and getting in to the enclosure when needed.
Noise is quieter than I thought it’d be. Don’t get me wrong if you’re light sleeper maybe consider having this away from your bedroom, but it’s just white noise in the background for me and easily ignoreable if you’re used to the sounds of electronics.
My only real complaint that is barely even a complaint since it’s just nitpicking about a feature that really doesn’t need to be there is the camera is extremely low quality and struggles to stay connected to any app that uses it, but it does still work and lets me peak at the print when i’m away.
All in all I was shocked at how easy it was to get this thing in to working order and learn enough to start just blowing through filament making stuff for the projects I’ve been putting off until I could either order parts from a 3d printing company or get a friend to do it for me. Again, I knew absolutely nothing about how any of this worked prior to getting this thing.
If you’re a beginner looking for your first printer, this is an option I can’t recommend enough.
marine gandemer –
Flashforge Adventurer 3 is the best starter 3d printer for beginners as the quality of prints is totally good. This is an enclosed 3d printer wherein the temperature will be stable when printing.
Very kind and responsible seller, I experienced some minor issues with this 3D Printer and this seller is 100% responsible and took care of my needs. Thank you.
marine gandemer –
Aperta, accesa e subito ha stampato alla grande. Adesione sempre perfetta, definizione alta, con PLA ripiano a 55 gradi e filamento a 210 gradi stampa tutto alla perfezione senza sbavature!
TOP!!!
matteo Soligo –
Bonjour, j’ai du mal à trouvé du filament 1.5
C’est diamètre 180 je me cache pas je suis débutant ça fait trois fois que je le commande et 3 fois je le renvoie, si un persone peut m’aider merci,, sympa